Recently there has been a trend of fading photos and getting that dreamy artistic Matte look. Today I will show you how to achieve this look in Lightroom.
First, you need an image in RAW format. In this case, we downloaded an image from wesaturate.com.
First we imported it into Lightroom…

Next we started our basic edits – adjusting the highlights and exposure.

Here are the basic edits that we performed. We added a little bit of exposure to the image to make it a little brighter. Howeve, when we did this it blew the highlights in the clouds out. We brought the highlights down to compensate and to retrieve the data that was lost by the exposure boost. Next, we added a little bit of light to the shadows, and boosted the whites. Lastly we decreased the blacks, added contrast, and boosted the clarity to really make the imae pop.
This is how our image looked after applying the basic edits.


Next we applied a custom tone curve to create that faded effect. The one we added lifts the darks and then curves up to natural highlights. This softens the blacks and fades solid colors.
Our image now looks like this.
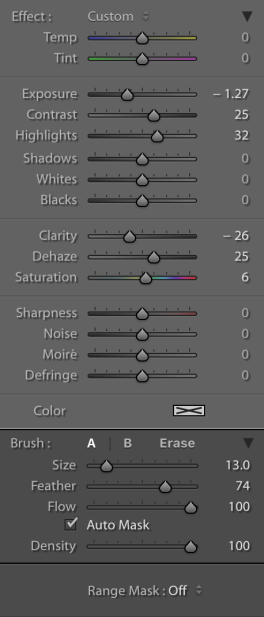
This looks really nice and the fade is awesome, however, the clouds are still blown out of detail. I fixed this by adding a brush layer over the clouds and decreasing the exposure. I also increased the sturation and the highlights. This fixed the clouds and added to the overall quality of the image.
 And here we have the final image. It is properly exposed and has a nice fade.
Here is the before and after of this effect side-by-side.
Click Here to download the Free Lightroom Preset that I created for this photo and Here to download the files that I used.
Share this: