Having carried out some DIY painting in the past I decided this time I would invest in good tools as this was going to be the biggest job to date. This first entailed selecting a brand whose painting equipment is rated highly. I selected tools from the Wooster product range.
There are a few essential tools.-
- The Pole (I selected a 4 to 8 foot adjustable pole called the Wooster Sherlock GT extension pole ). This tool has a few good features such as snap on paint roller head, an extension that snaps in set positions, a tool to fit screw type paint rollers. A substantial rubber hand grip that made the job easier . The highest point of our ceilings are 3.6 metres and this version allowed me to reach the ceilings directly from the floor. Narrow hallways that are less than the length of the pole plus the roller would make it difficult to use this pole length.
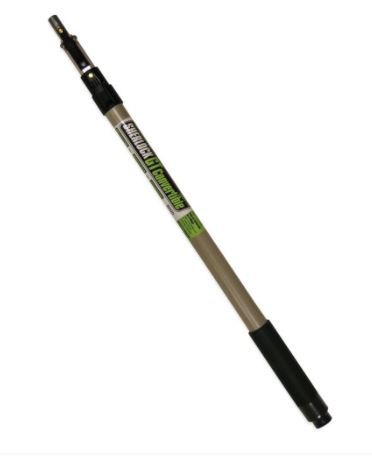
- The Pole (I selected a 4 to 8 foot adjustable pole called the Wooster Sherlock GT extension pole ). This tool has a few good features such as snap on paint roller head, an extension that snaps in set positions, a tool to fit screw type paint rollers. A substantial rubber hand grip that made the job easier . The highest point of our ceilings are 3.6 metres and this version allowed me to reach the ceilings directly from the floor. Narrow hallways that are less than the length of the pole plus the roller would make it difficult to use this pole length.
- Rollers– I selected a 3/8 inch nap (pile depth) for the plasterboard because of its smooth surface and I tried a 9 and 14 inch roller called the pro-doo-z. The Nap determines the amount of paint applied and the paint texture of the wall surface . The 3/8 inch gives a fine finish. If one used a 1/2 inch nap the roller can hold more paint but the texture is different. After trying the 9 inch and 14 inch roller my preference was to use the 14 inch roller as I found it easier, faster and more stable because it is supported at both ends (see below). I would be tempted to try the contract rollers that are supposed to be faster the next time but the finish may not be the same. One can select the right roller from the web site link Wooster Rollers.
-
-
- Cutting In– A very useful and time saving tool was the Wooster hand-held Pelican kettle .
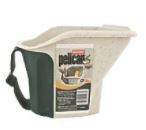 Pelican Kettle
It is available with liners to make it easy to change colours. It has a section to hold a cutting in brush and a mechanism to hold a small roller. Both of these are necessary in order to end up with the same wall surface texture as the main roller for example around switches and sockets. I used non diluted paint for the cutting in process. One needs a mini roller also for the Pelican holder.
- Brush– The cutting in brush I used was the Silver tip wooster 2 inch model. I never owned a high quality brush before and it is working out great.
- Tray/Kettle-I tried the Tray and the Kettle. My preference is the 25 litre Kettle with replaceable liners. I initially bought a Kettle with no liners and the washing out of the tray or kettle at the end of a days painting is time consuming and non environmental as one must wash the inside completely . Comparing this to using a liner that one can dispose of in the bin. I know at the end of the day it all is non environmental but using plastic liners keeps everything clean and saves time.
- Safety Glasses and peaked cap -While painting the ceiling it is a vital item.
- Fresh Air– While the paint is wet the smell is stronger so ensure that your rooms are very well vented. As I am painting in the winter the house temperature has dropped to approximately 9 degrees.
- Paint-I used Dulux paint as it has a good reputation for quality.
- Cling Film-In order to keep the brushes and rollers clean I wrapped them in clingfilm overnight. The roller lasted a week and I did not notice any problems even with this amount of time . One just took of the clingfilm and started again with no cleaning required. It also reduces waste.
- Cutting In– A very useful and time saving tool was the Wooster hand-held Pelican kettle .
-
-
Technique I used for painting
First Coat– For the first coat on the plasterboard I mixed the paint to a 3 to 1 ratio (one litre of water to 3 litres of paint) as advised. By diluting the paint for the first coat it is supposed to allow the paint to get a good bond with the paper finish on the plasterboard. I did not use the traditional wet plaster method on the walls. The paint also needs to be mixed in a separate container. One requires a 1 litre container to carry out the measuring. I experimented with a lower ratio of water and I could not see much of a difference with the Dulux matt white paint on the bare plasterboard only that with two paint coats undiluted the finish looked better . If the walls were wet plastered in the traditional way then the water mix appears to be vital.
I started out using the paint brush and mini roller for the first cutting in but later on I just used the paint brush for the first cut and then used the paint brush and mini roller for the second cut in order to finish with the same texture as the 14 inch roller.
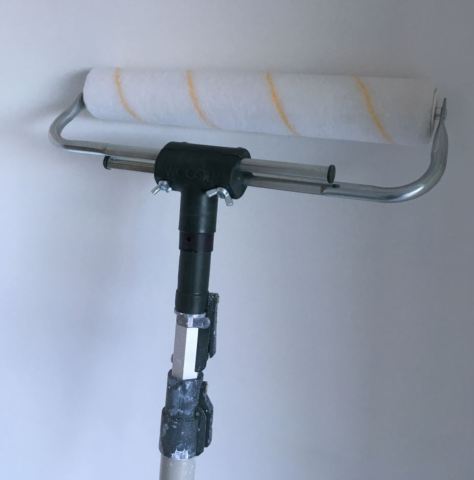 14 Inch Roller
After watching numerous methods and comparing the comments I think the following is the best I have come across to date and having used the ideas it it all makes sense. With Youtube I found one has to watch about ten videos and then decide who is doing it right. Below may help.
https://youtu.be/v61PVzLNemk
Imperfections .
When the first coat of paint is applied it often identifies small imperfections in the plastering. When this happens let the paint dry and fill the imperfection with USG or Gyproc ready made joint filler. When this has fully dried sand it by hand and repaint it with a few coats. This method worked for me.

Share this: