Two great things about iOS development are the fantastic community, and the wide range of available third party libraries.
If you’ve coded on the platform for a while, chances are you’ve used at least one of these libraries. Whether it’s Alamofire, Locksmith, or Kingfisher, you already know the value of making use of someone else’s code because you’re not fond of reinventing the wheel.
Then there’s CocoaPods. If you’re not acquainted with this lovely tool, it’s a popular dependency manager that streamlines the process of integrating these sorts of libraries into your project.
It’s widely used in the iOS community, and even Google uses it to distribute their various iOS SDKs.
Alongside Swift 3.0, Apple has released its own tool called Swift Package Manager to share and distribute packages in Swift 3.0 and above. Apple defines it as:
The Swift Package Manager is a tool for managing the distribution of Swift code. It’s integrated with the Swift build system to automate the process of downloading, compiling, and linking dependencies.
While CocoaPods and Swift Package Manager are awesome, there are other options. Carthage is one such alternative; it’s a ruthlessly simple dependency manager for macOS and iOS, created by a group of developers from Github.
It was the first dependency manager to work with Swift; in fact, Carthage itself is written in Swift! It exclusively uses dynamic frameworks instead of static libraries – this is the only way to distribute Swift binaries that are supported by iOS 8 and up.
In this Carthage tutorial, you’ll learn and do the following:
- Why and when to use a dependency manager, and what makes Carthage different
- How to install Carthage
- How to declare dependencies, installing and integrating them within a project
- How to upgrade your dependencies to different versions
- Build an app that provides definitions for search terms using the DuckDuckGo API
Note: This Carthage tutorial assumes that you have basic familiarity with iOS and Swift, that you’re familiar with Xcode and working with the command line.
Getting StartedFirst of all, download the starter project for this Carthage tutorial.
It includes the basic skeleton of DuckDuckDefine, a simple tool to look up definitions and images using the DuckDuckGo API. There’s just one problem: It doesn’t actually perform any searches yet!
Open DuckDuckDefine.xcodeproj in Xcode and have a quick look around to familiarize yourself. Note the two view controllers: SearchViewController provides a search bar for the user to perform a search, and DefinitionViewController displays the definition of a search term.
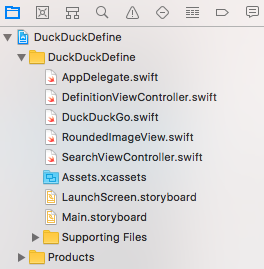
The brains of the operation are in DuckDuckGo.swift — or at least they will be by the time you’re finished! At the moment, performSearch(for:completion:) is a lazy, good-for-nothing block of code.
To make it perform a search and display the results, you’ll need to do two things:
- Make a query using the DuckDuckGo API
- Show an image for the retrieved word
There are a number of open source libraries that can help with these two tasks. Alamofire is a great Swift library which simplifies making web requests, and AlamofireImage makes dealing with images in Swift a more pleasant experience.
And guess what? You’ll use Carthage to add both of these dependencies to your project.
Dependency ManagementTo add Alamofire and AlamofireImage to your project, you could of course just visit their respective Github pages, download a zip file of the source and drop them into your project. So why bother with a tool like Carthage?
Dependency managers perform a number of handy functions:
- They simplify and standardize the process of fetching third party code and incorporating it into your project. Without such a tool, this might be done by manually copying source code files, dropping in precompiled binaries, or using a mechanism like Git submodules.
- They make it easier to update third party libraries in the future. Imagine having to visit each dependency’s GitHub page, download the source, and place it into your project every time there’s an update. Why would you do that to yourself?
- They pick out appropriate and compatible versions of each dependency you use. For instance, if you’re manually adding dependencies, things can get tricky when they depend on one another or share another dependency.

Most dependency managers will construct a dependency graph of your project’s dependencies, and each of their sub-dependencies, and then determine the best version of each to use.
You could probably do the same manually, but at what cost? Your sanity?
Carthage vs CocoaPodsSo how exactly is Carthage different from CocoaPods, and why would you use anything besides the most popular dependency manager for iOS?
Carthage’s developers felt that whilst CocoaPods is generally easy to use, simple it is not. The philosophy behind Carthage is that this tool should be ruthlessly simple.
CocoaPods adds complexity to both the app development and the library distribution processes:
- Libraries must create, update and host Podspec files (or app developers must write their own if one doesn’t exist for a library that they wish to use).
- When adding “pods” to a project, CocoaPods creates a new Xcode project with a target for each individual pod, as well as a containing workspace. Then you have to use the workspace and trust that the CocoaPods project works correctly. Talk about a lot of extra build settings to maintain.
- CocoaPods’ Podspecs repository is centralized, which could be problematic if for some reason it were to disappear or become inaccessible.
The Carthage project’s aim is to provide a simpler tool than CocoaPods; one that’s easier to understand, easier to maintain and more flexible.
It achieves this in a number of ways:
- Carthage doesn’t modify your Xcode project or force you to use a workspace.
- There’s no need for Podspecs or a centralized repository for library authors to submit their pods to. If your project can be built as a framework, it can be used with Carthage. It leverages existing information straight from Git and Xcode.
- Carthage doesn’t really do anything magic; you’re always in control. You manually add dependencies to your Xcode project and Carthage fetches and builds them.
Note: Carthage uses dynamic frameworks to achieve its simplicity. This means your project must support iOS 8 or later.
Carthage vs Swift Package ManagerHow about the differences between Carthage and Swift Package Manager?
The main focus of the Swift Package Manager is to share Swift code in a developer-friendly way. Carthage’s focus is to share dynamic frameworks. Dynamic frameworks are a superset of Swift packages since they may contain Swift code, Objective-C code, non-code assets (e.g. images) or any combinations of the three.
Note: A package is a collection of Swift source files plus a manifest file.
The manifest file defines the package’s name and its content.
Now that you’ve got some background on things, that’s enough talk. It’s time to learn for yourself how ruthlessly simple Carthage is!
At the core of Carthage is a command line tool that assists with fetching and building dependencies.
There are two ways to install it: downloading and running a .pkg installer for the latest release, or using the Homebrew package manager. In the same way that Carthage helps install packages for your Cocoa development, Homebrew helps install useful Unix tools for MacOS.
For the purposes of this Carthage tutorial, you’ll use the .pkg installer. Download the latest release of Carthage from the list here. Select the most recent build, then under Downloads select Carthage.pkg.
Double-click Carthage.pkg to run the installer. Click Continue, select a location to install to, click Continue again, and finally click Install.
Note: When you attempt to run the installer, you may see a message stating “Carthage.pkg can’t be opened because it is from an unidentified developer.” If so, Control-click the installer and choose Open from the context menu.
And you’re done! To check that Carthage installed correctly, open Terminal and run the following command:
carthage versionIf all has gone to plan, you’ll see the version number of Carthage that was installed.
Note: At the time of writing, the current version of Carthage was 0.23.
Next, you need to tell Carthage which libraries to install. This is done with a Cartfile.
Creating Your First CartfileA Cartfile is a simple text file that describes your project’s dependencies to Carthage, so it can determine what to install. Each line in a Cartfile states where to fetch a dependency from, the name of the dependency, and optionally, which version of the dependency to use. A Cartfile is the equivalent of a CocoaPods Podfile.
Navigate to the root directory of your project in Terminal (the directory that contains your .xcodeproj file) using the cd command:
cd ~/Path/To/Starter/ProjectCreate an empty Cartfile with the touch command:
touch CartfileAnd then open the file up in Xcode for editing:
open -a Xcode CartfileIf you’re familiar with another text editor, like Vim, then feel free to use that instead. Don’t, however, use TextEdit to edit the file; with TextEdit it’s too easy to accidentally use so-called “smart quotes” instead of straight quotes, and they will confuse Carthage.
Add the following lines to the Cartfile and save it:
github "Alamofire/Alamofire" == 4.5 github "Alamofire/AlamofireImage" ~> 3.2These two lines tell Carthage that your project requires Alamofire version 4.5, and the latest version of AlamofireImage that’s compatible with version 3.2.
The Cartfile FormatCartfiles are written in a subset of OGDL: Ordered Graph Data Language. It sounds fancy, but it’s really quite simple. There are two key pieces of information on each line of a Cartfile:
- Dependency origin: This tells Carthage where to fetch a dependency from. Carthage supports two types of origins:
- github for Github-hosted projects (the clue’s in the name!). You specify a Github project in the Username/ProjectName format, just as you did with the Cartfile above.
- git for generic Git repositories hosted elsewhere. The git keyword is followed by the path to the git repository, whether that’s a remote URL using git://, http://, or ssh://, or a local path to a git repository on your development machine.
- Dependency Version: This is how you tell Carthage which version of a dependency you’d like to use. There are a number of options at your disposal, depending on how specific you want to be:
- == 1.0 means “Use exactly version 1.0”
- >= 1.0 means “Use version 1.0 or higher”
- ~> 1.0 means “Use any version that’s compatible with 1.0″, essentially meaning any version up until the next major release.
- If you specify ~> 1.7.5, then any version from 1.7.5 up to, but not including 2.0, is considered compatible.
- Likewise, if you specify ~> 2.0 then Carthage will use a version 2.0 or later, but less than 3.0.
- Compatibility is based on Semantic Versioning – for more information check out our tutorial on Using CocoaPods with Swift.
- branch name / tag name / commit name means “Use this specific git branch / tag / commit”. For example, you could specify master, or a commit has like 5c8a74a.
If you don’t specify a version, then Carthage will just use the latest version that’s compatible with your other dependencies. You can see examples of each of these options in practice in Carthage’s README file.
Building DependenciesSo now you have a Cartfile, it’s time to put it to use and actually install some dependencies!
Note:This Carthage tutorial uses Swift 4, and at the time of this Carthage tutorial, Swift 4 is only available in Xcode 9. Ensure that your command line tools are configured to use Xcode 9. Run the following command from Terminal: sudo xcode-select -s <path to Xcode 9 beta>/Xcode-beta.app/Contents/DeveloperBe sure to replace path to Xcode 9 beta with your machine’s specific path to Xcode 9.
Close your Cartfile in Xcode and head back to Terminal. Run the following command:
carthage update --platform iOSThis instructs Carthage to clone the Git repositories that are specified in the Cartfile, and then build each dependency into a framework. You should see output that shows what happened, similar to this:
*** Fetching AlamofireImage *** Fetching Alamofire *** Checking out Alamofire at "4.5.0" *** Checking out AlamofireImage at "3.2.0" *** xcodebuild output can be found in /var/folders/cn/tknd724s0fv8pbdcbkg2sb6w0000gn/T/carthage-xcodebuild.no8ytB.log *** Building scheme "Alamofire iOS" in Alamofire.xcworkspace *** Building scheme "AlamofireImage iOS" in AlamofireImage.xcworkspaceThe --platform iOS option ensures that frameworks are only built for iOS. If you don’t specify a platform, then by default Carthage will build frameworks for all platforms (often both Mac and iOS) supported by the library.
If you’d like to take a look at further options available, you can run carthage help update.
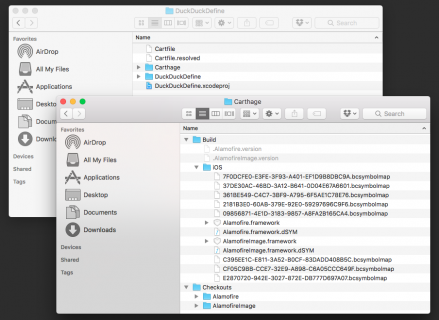
By default, Carthage will perform its checkouts and builds in a new directory named Carthage in the same location as your Cartfile. Open up this directory now by running:
open CarthageYou should see a Finder window pop up that contains two directories: Build and Checkouts. Take a moment to see what Carthage created for you.
If you’re familiar with CocoaPods, you know that it makes a number of changes to your Xcode project and binds it together with a special Pods project into an Xcode workspace.
Carthage is a little different. It simply checks out the code for your dependencies, builds it into binary frameworks, and then it’s up to you to integrate it into your project. It sounds like extra work, but it’s beneficial. It only takes a few steps and you’ll be more cognizant of the changes to your project as a result.
When you run carthage update, Carthage creates a couple of files and directories for you:
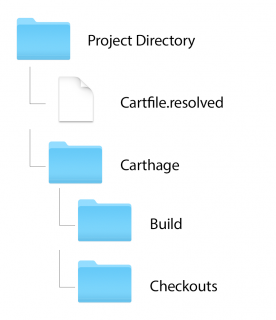
- Cartfile.resolved: This file is created to serve as a companion to the Cartfile. It defines exactly which versions of your dependencies Carthage selected for installation. It’s strongly recommended to commit this file to your version control repository, because its presence ensures that other developers can get started quickly by using exactly the same versions of dependencies as you.
- Carthage directory, containing two subdirectories:
- Build: This contains the built framework for each dependency. These can be integrated into your project, which you’ll do shortly. Each framework is either built from source, or downloaded from the project’s “Releases” page on Github.
- Checkouts: This is where Carthage checks out the source code for each dependency that’s ready to build into frameworks. Carthage maintains its own internal cache of dependency repositories, so it doesn’t have to clone the same source multiple times for different projects.
Whether you commit the Build and Checkouts directories to your version control repository is entirely up to you. It’s not required, but doing so means that anybody who clones your repository will always have the binaries and source for each dependency available.
Having this backup can be a useful insurance policy if, for example, Github is unavailable or a source repository is removed completely.
Don’t modify any code inside the Checkouts folder because its contents may be overwritten at any time by a future carthage update or carthage checkout command, and your hard work would be gone in the twinkling of an eye.
If modifications to your dependencies are a must do, you can run carthage update using the --use-submodules option.
With this option, Carthage adds each dependency in the Checkouts folder to your Git repository as a submodule, meaning you can change the dependencies’ source, and commit and push those changes elsewhere without fear of an overwrite.
Note: If other users need to use your project, and you haven’t committed the built frameworks with your code, then they will need to run carthage bootstrap after checking out your project.
The bootstrap command will download and build the exact versions of your dependencies that are specified in Cartfile.resolved.
carthage update, on the other hand, would update the project to use the newest compatible versions of each dependency, which may not be desirable.
Now, how about actually using these build artifacts you worked so hard to create?
Adding Frameworks to Your ProjectBack in Xcode, click the DuckDuckDefine project in the Project Navigator. Select the DuckDuckDefine target, choose the General tab at the top, and scroll down to the Linked Frameworks and Libraries section at the bottom.
In the Carthage Finder window, navigate into Build\iOS. Drag both Alamofire.framework and AlamofireImage.framework into the Linked Frameworks and Libraries section in Xcode:
This tells Xcode to link your app to these frameworks, allowing you to make use of them in your own code.
Next, switch over to Build Phases and add a new Run Script build phase by clicking the + in the top left of the editor. Add the following command:
/usr/local/bin/carthage copy-frameworksClick the + under Input Files and add an entry for each framework:
$(SRCROOT)/Carthage/Build/iOS/Alamofire.framework $(SRCROOT)/Carthage/Build/iOS/AlamofireImage.frameworkThe result should look like this:
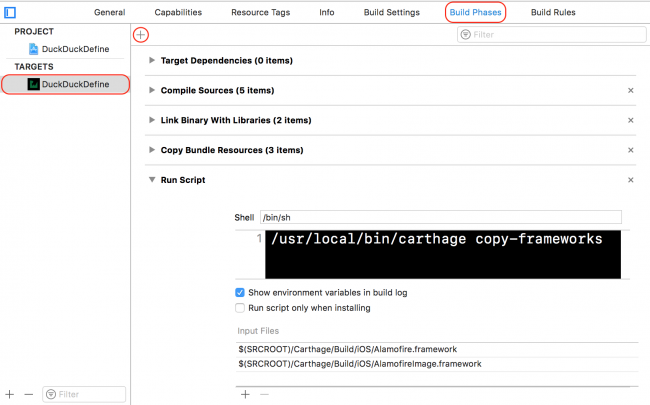
Strictly speaking, this build phase isn’t required for your project to run. However, it’s a slick workaround for an App Store submission bug where apps with frameworks that contain binary images for the iOS simulator are automatically rejected.
The carthage copy-frameworks command strips out these extra architectures. w00t!
There won’t be anything new to see yet, but build and run the app to ensure everything’s still working as expected. When the app launches, you should see the search view controller.
OK, great. Things are looking good. Next, upgrading dependencies.
Upgrading FrameworksI have a confession to make.
Remember when you created your Cartfile earlier, and I told you what versions of Alamofire and AlamofireImage to install? Well, you see, I gave you bad information. I told you to use an old version of Alamofire.
Don’t be mad though! It was done with the best of intentions. Look on this as an opportunity…yes, an opportunity to learn how to upgrade a dependency. It’s a gift, really.
Open up your Cartfile again. From your project’s directory in Terminal, run:
open -a Xcode CartfileChange the Alamofire line to:
github "Alamofire/Alamofire" ~> 4.5.0As you saw earlier, this means to use any version of Alamofire that’s compatible with 4.5.0, so, any version up to but not including a future 5.0 version.
When adding dependencies with Carthage, it’s a good idea to consider compatibility and limit the version that you’re targeting. That way, you know the exact state of its API and functionality.
For example, version 5.0 of a dependency might include app-breaking API changes — you likely wouldn’t want to automatically upgrade to it if you built your project against 4.5.0.
Save and close the Cartfile, and return to the terminal. Perform another update:
carthage update --platform iOSCarthage will look for newer versions of each of your dependencies, then check them out and build them if necessary. You should see it fetch the latest version of Alamofire.
Because your project already contains a reference to the built .framework for Alamofire, and Carthage rebuilds the new version in the same location on disk, you can sit back and let Carthage do the work; your project will automatically use the latest version of Alamofire!
Duck, Duck… GO!Now that you’ve integrated Alamofire and AlamofireImage with the project, you can put them to use to perform some web searches. Are you ready?
In Xcode, open DuckDuckGo.swift. At the top of the file, add the import below:
import AlamofireNext, replace the existing definition of performSearch(for:completion:) with this:
func performSearch(for term: String, completion: @escaping (Definition?) -> Void) { // 1 let parameters: Parameters = ["q": term, "format": "json", "pretty": 1, "no_html": 1, "skip_disambig": 1] // 2 Alamofire.request("https://api.duckduckgo.com", method: .get, parameters: parameters).responseData { response in // 3 if response.result.isFailure { completion(nil) return } // 4 guard let jsonData = response.result.value else { completion(nil) return } // 5 let decoder = JSONDecoder() let definition = try? decoder.decode(Definition.self, from: jsonData) // 6 if let definition = definition, definition.resultType == .article { completion(definition) } else { completion(nil) } } }There’s quite a bit here, so let’s break it down:
Note: If you’re wondering why the skip_disambig parameter exists, it’s to tell DuckDuckGo not to return ‘disambiguation’ results.
Disambiguation results are like those pages you see on Wikipedia: did you mean Chris Evans the movie actor, Chris Evans the British TV personality, or Chris Evans the train robber?
skip_disambig means the API will just pick the most likely result and return it.
Build and run! Once the app starts, enter “Duck” in the search bar. If everything’s working correctly, you should see a definition on the next screen.
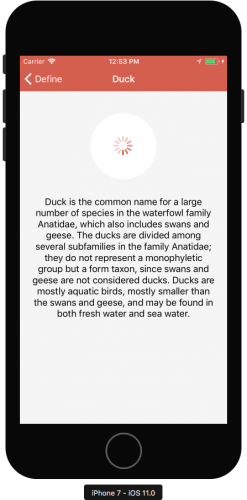
There’s one thing missing, however: a picture! It’s one thing being able to read what a duck is, but who reads anymore? Pictures are worth — okay, I’ll spare you the cliché — you know what I mean.
Anyways, who doesn’t like looking at pictures of ducks? Kittens are so last season, right?
Open DefinitionViewController.swift, and add import AlamofireImage just below the existing UIKit import at the top:
import AlamofireImageThen, at the following code just below viewDidLoad() method:
override func viewDidAppear(_ animated: Bool) { super.viewDidAppear(animated) if let imageURL = definition.imageURL { imageView.af_setImage(withURL: imageURL, completion: { _ in self.activityIndicatorView.stopAnimating() }) } }af_setImage is an extension on UIImageView provided by AlamofireImage. You call it to retrieve the image found in the definition imageURL. Once retrieved, the activity indicator’s animation is stopped.
Build and run, and perform your search again.
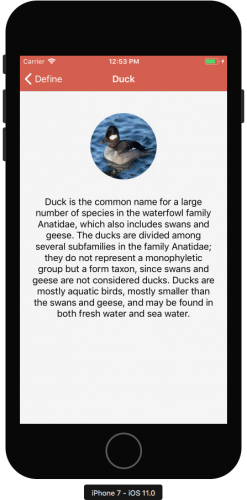
Quack quack!
Advertisements Share this:![IMG_2751[273]](/ai/024/775/24775.jpg)