I am now discussing color transformations for creating kaleidoscopic images with two-color symmetry. Each pixel has three color components: red, green and blue. Their values are between 0 and 255. Thus we can think that a pixel color is a point with coordinates (r, g, b) inside a three-dimensional cube. The corners of the cube are the following: black with coordinates (0,0,0) and white (255, 255, 255), the primary colors red (255, 0, 0), green (0, 255, 0) and blue (255, 0, 0) and the secondary colors cyan (0, 255, 255), magenta (255, 0, 255) and yellow (255, 255, 0). A color transformation is a mapping of points inside this cube. Clearly, it should not map points into the outside of the cube because all possible colors are in its inside. Further, the mapping should not destroy information. This means that every point in the cube is only the image of exactly one other point and that the color transformation has an inverse.
For two-color symmetry we want that the transformation is its own inverse. Then we could not say which part of the kaleidoscopic image has the original colors and which part has the transformed colors without knowing the input image.
The most simple transformation with these properties is making the negative image:
r → 255 – r, g → 255 – g and b → 255 – b.
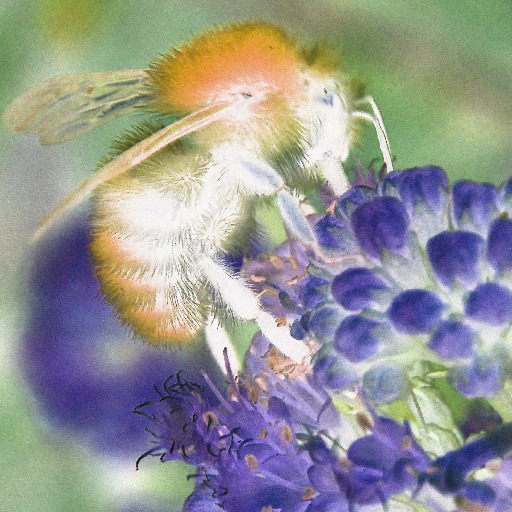
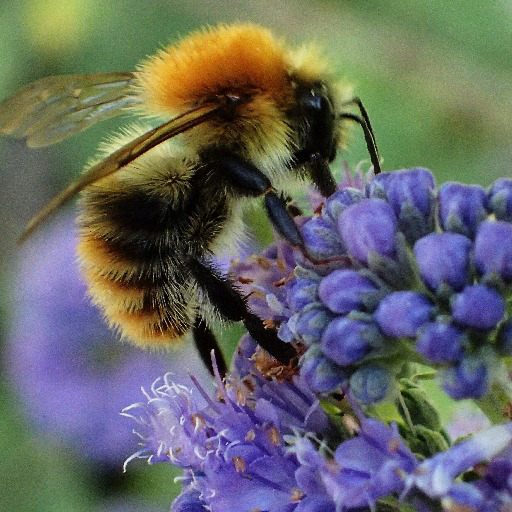
This inverts the color cube and maps black to white, red to cyan, blue to yellow and green to magenta. The result is often quite bewildering. Consider this photo of a bee on lavender blossoms:
Its negative image is quite strange:

This is no surprise for those who do analogue photography. The developed negative does not give a good idea of the final image both in color or black and white photography. The problem is that dark parts become light and inversely. This makes it difficult to recognize details of the input image in the kaleidoscopic image with transformed colors.
We might want to have a different transformation. The grays should not be changed; especially, black remains black and white remains white. The other corners of the color cube should map as for making the negative image. To get this, we dissect the pixel color into two parts: an achromatic grey and a fully saturated color. The grey part results from the smallest of the red, green or blue components. If
s = min(r, g, b),
then (s,s,s) are the coordinates of the grey. It has no hue, zero saturation (colorfulness) and its intensity is given by s. By the way, you can call s “value” or “brightness” or whatever, see https://en.wikipedia.org/wiki/HSL_and_HSV. Subtracting this, we get the color part with components (r-s,g-s,b-s). At least one of these components is equal to zero, which means that we have a fully saturated color. Its hue depends on the input image. The largest of the three color components:
L = max(r, g, b)
defines its intensity. It is L-s.
To transform the color we leave the gray part as it is. For the saturated color part we want the smallest component to become the largest and inversely. This is easiest done by making a negative such as r-s→(L-s)-r-s=L-r. Adding the gray part, we get a simple transformation:
r → L+s-r,
g → L+s-g and
b → L+s-b.
You can easily verify that this transforms the corners of the color cube as desired and that this transformation is its own inverse. Using it on the image of the bee we get:

In spite of the false colors we recognize the bee very well. For some images you might prefer this transformation.
Then, we can use both transformations together, one after the other. The result does not depend on the order of execution. This combination exchanges black and white, whereas the other corners of the color cube stay in place. We get something strange like this: