This 6 colour collection from CND™ is outstanding. I’m going to let the colours do the talking in this blog. Herein will be lots of close ups of the Shellac and Vinylux incarnations of these sumptuous colours and nail design step by steps for looks I created integrating various nail art mediums. If you are looking for colour comparison shots, check out Sweet Squared’s Facebook Page, they are coming soon!
I will be taking over Sweet Squared’s Facebook with 90 MINUTE FACEBOOK LIVE broadcast on Tuesday 1st of August at 8pm – so put a reminder in your phone, get the kids to bed, get your dinner eaten and come hang out for banter, questions, nail design step by steps and tons of stamping troubleshooting.
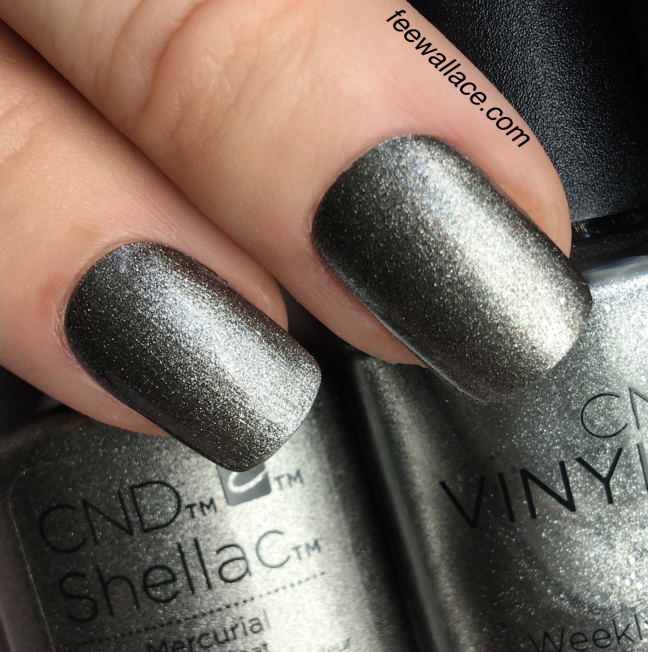
This is Mercurial, and it’s a one coat wonder! In both Shellac and Vinylux is gives beautiful, fully opaque coverage in it’s first layer. While two layers of colour is of course what is recommended for a standard application, a colour with this kind of opacity is useful as a base for nail designs that require multiple or additional layers of of other products when you want to prevent bulk.
The finish of Mercurial is extremely metallic. This isn’t some light shimmer, we’re talking serious texture and depth. Like natural, unpolished Hematite (which I recently discovered was found on Mars by the Mars Exploration Rover Microscopic Imager – fun fact!)
I experimented with a few nail art looks using Mercurial, including stamping and hand painting with the Vinylux incarnation. But my absolute favourite, the real stunner of the lot, was this simple matte finished design, which I’m calling Mercurial Deco.
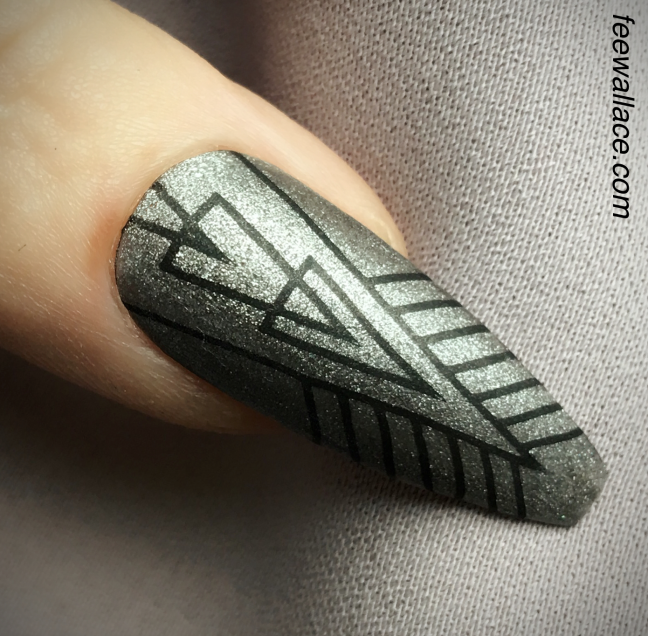
- After performing PEP to natural nails, apply and cure your Shellac Base Coat. Alternatively, if you’re decorating nail enhancements, prepare the surface and then apply and cure Shellac Mercurial – one layer over Enhancements, two layers over natural nails.
- Using the :YOURS Loves Fee stamping plate Deco Dreams, clean the plate and the :YOURS Halo Stamper with CND ScrubFresh and apply CND Creative Play Black + Forth. Scrape over 1-3 times with the scraper-card.
- Pick up the pattern with your Halo Stamper by rolling gently over the plate in a circle.
- Apply design to the sticky top film of the cured Shellac Mercurial, taking care to land the design dead centre.
- Remove any overhanging pieces of the design with a firm brush or a wooden stick.
- To finish, apply Shellac Duraforce Top Coat and cure. Then, after removing the top film from the cured Top Coat, buff all over the surface of the nails with the green side of a fresh CND™ Glossing Buffer to mattify. Tip – retail the Glossing Buffer to your client so they can have have perfectly matte nails right up till their next appointment.
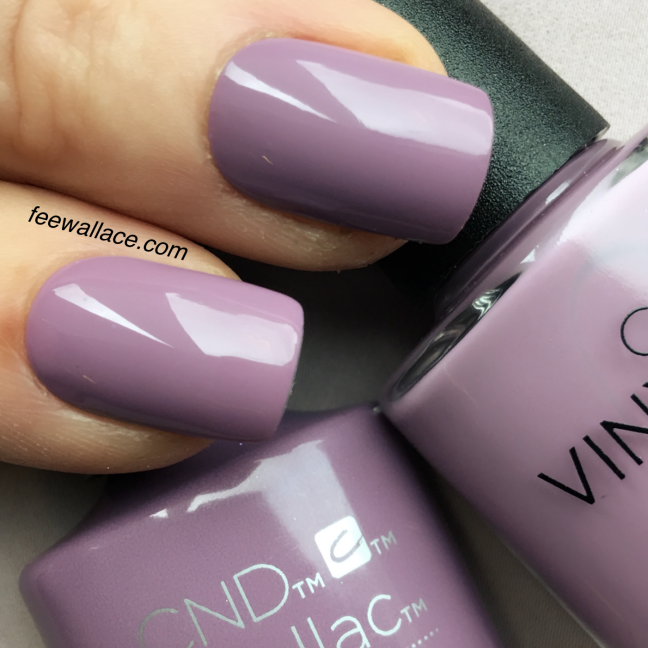
Next up, let’s talk about Lilac Eclipse. Well, isn’t this just exactly what we’ve been looking for?! Somewhere between Lilac Longing and Married to the Mauve, it’s a beautiful, almost smokey, dusky, light, minky-powder-purple. This colour is totally creme with absolutly no shimmer whatsoever. I am pleased to report that the coverage is impeccable and I am more than happy with one coat coverage for full opacity over enhancements.
For the design below I stamped with both CND™ Vinylux and Creative Play. I used the Vinylux incarnation of Lilac Eclipse to stamp over the Shellac version because I wanted to create a kind of negative print impression after the Lecenté Rainbow Chrome Powder was applied. I think it works really well, and it’s a wonderfully theatrical technique to execute in front of your client’s amazed eyes. This one I’ve called, The Rainbow Chrome Conspiracy. For no reason other than I like the sound of it.
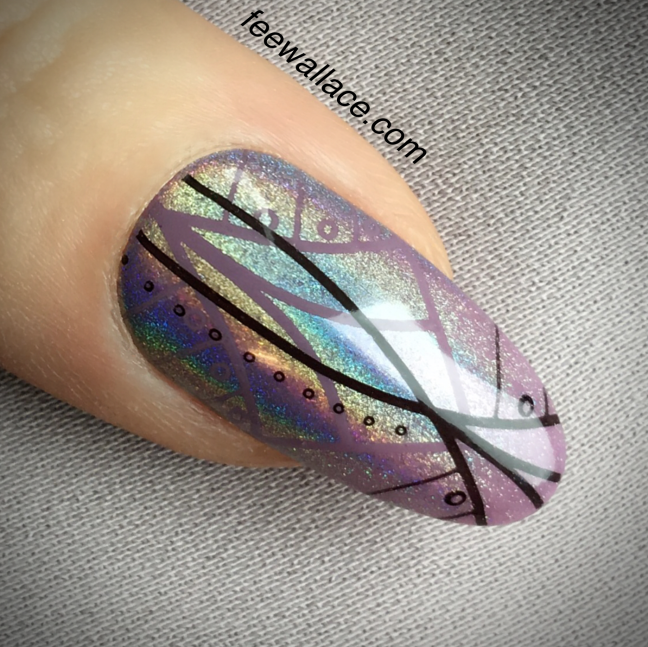
- After performing PEP to natural nails, apply and cure your Shellac Base Coat. Alternatively, if you’re decorating nail enhancements, prepare the surface and then apply and cure Shellac Lilac Eclipse – only one layer needed.
- Now apply a super thin layer of Lecenté Layer It and cure in the CND™ LED Lamp using the S2 button. Tip – Layer It can look a bit ‘gritty’ when it’s first applied, do not be tempted to apply it more thickly for smoothness, it WILL smooth out naturally in less than 10 seconds! Do not wipe after curing, proceed directly to the next step.
- Using the :YOURS Loves Fee stamping plate Hello Petal, clean the plate and the :YOURS Halo Stamper with CND ScrubFresh and apply CND™ Vinylux Lilac Eclipse. Scrape over once firmly with the scraper-card.
- Pick up the pattern with your Halo Stamper by rolling gently over the plate.
- Apply the design to the sticky top film of the cured Shellac colour, taking care to land the design dead centre. Tip – because you are stamping the same colour over the base colour this can seem tricky, make sure you have enough light and you’ll be fine!
- Now clean the plate and stamper with CND ScrubFresh and apply Creative Play Black + Forth. Scrape over 1-3 times with the scraper-card. Remove any overhanging pieces of the design with a firm brush or a wooden stick.
- Use a piece of dense cosmetic sponge dipped into Lecenté Rainbow Chrome Powder to apply a very small amount of powder, first to the cuticle line, then up towards the extension edge of the nail. Tip – this is when the first stamped on design will magically come to life and be revealed!
- Smooth over the entire nail with a clean piece of cosmetic sponge to remove any excess powder floating about.
- To finish, apply the Shellac Top Coat best suited to the needs of your clients nails.
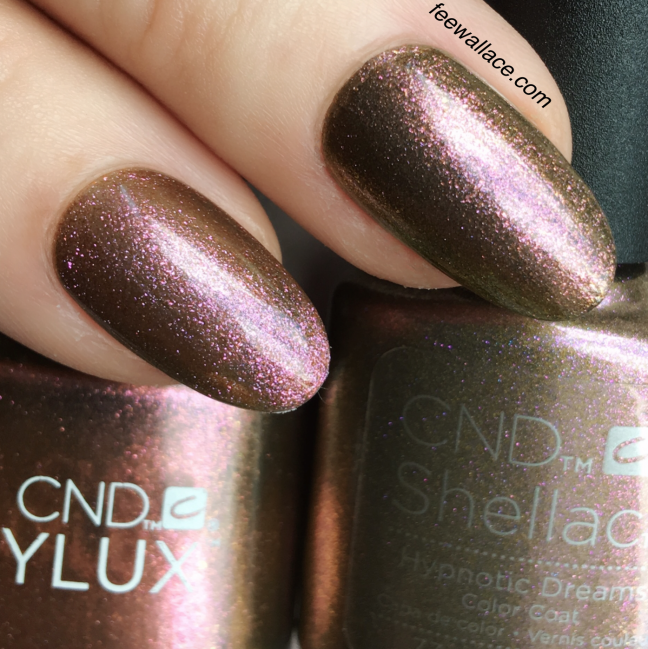
Hypnotic Dreams is a super unusual colour! It looks different from every angle, in every light. It is absolutly spellbinding. The name is very apt, you could get totally lost just looking at the colour changing. In the photograph above it’s a kind of golden-pink-minky-bronze? But it can look really bright gold, or dark metallic green or even a soft shimmery faun, depending from what angle you glance at it. At first i thought it was going to need 3 coats for proper opacity, but I have found two layers to be sufficient in both the Shellac and Vinylux incarnations.
Layering Hypnotic Dreams over other colours looks amazing with Shellac, and with Vinylux, sponging on the colour to create an ombré fade is really cool too.
I went all out for this look with golden opulence. Cleopatra, is indeed, comin’ atcha..x
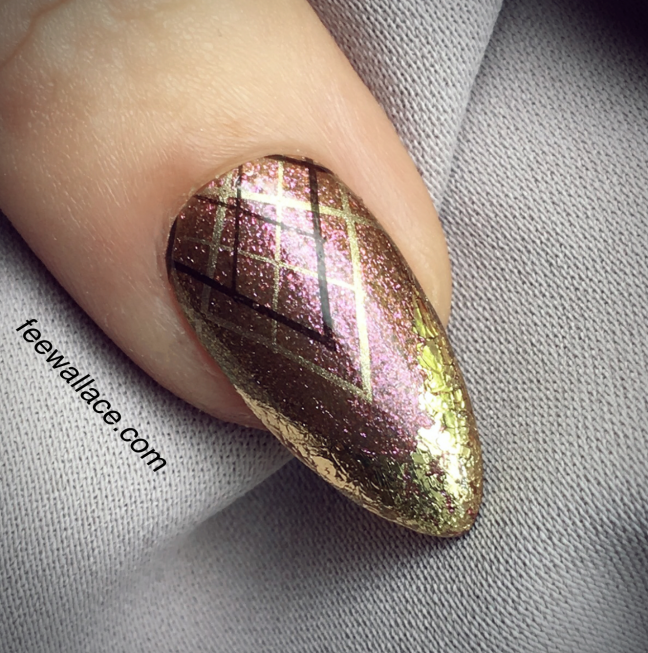
- After performing PEP to natural nails, apply and cure your Shellac Base Coat. Alternatively, if you’re decorating nail enhancements, prepare the surface and then apply and cure two layers of Shellac Hypnotic Dreams.
- To the cured colour layer, apply Lecenté Bright Gold Foil along the extension edge of the nail to create a corroded metallic smile line.
- Using the :YOURS Loves Fee stamping plate Deco Dreams, clean the plate and the :YOURS Halo Stamper with CND ScrubFresh and apply CND Creative Play Let’s Go Antiquing. Scrape over 1-3 times with the scraper-card. Pick up the pattern with your Halo Stamper by rolling gently over the plate in a circle.
- Now use a folded pad, moistened with ScrubFresh to remove and parts of the design from the stamper you don’t want to use.
- Apply design to the sticky top film of the cured Shellac, taking care to land the design dead centre.
- Stamp again, this time using Creative Play Black + Forth, landing the design a few millimetres lower towards the cuticle line.
- Remove any overhanging pieces of the design with a brush or a wooden stick.
- To finish, apply and cure the Shellac Top Coat coat most suitable for your client’s needs.
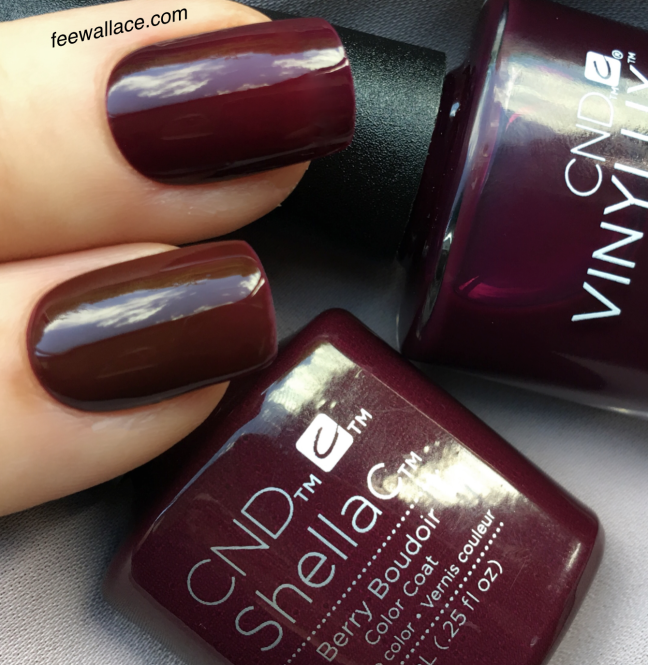
Berry Boudoir, what can I say? So shiny on these nails you can see the clouds in the sky reflecting off them (look at the pic, you actually can!) A very very slight almost imperceptible difference between the Shellac and Vinylux incarnations. I’d say the Shellac version is just a hint more opaque and ever so slightly warmer. Now when i first saw it I thought, really? Is this not just Oxblood all over again? But it’s actually quite different. Berry Boudoir is MUCH more cherry than Oxblood, and much less raspberry than Tinted Love. I have several clients who are completely addicted to this kind of colour all year round. You know the ones, the clients who started paying attention to nails when they saw Uma Thurman in Pulp Fiction wearing short square nails coated in Channel Vamp in the 90s. That was a nail style and colour so culturally important, it has it’s own Wikipedia page. I am over the moon to have a new colour to offer this crowd who never stray far from Decadence, Fedora or Oxblood. It’s over a year since Oxblood came out, these woman are desperate for something with a new feel that still ticks all the boxes of their fashion parameters.
I indulged myself a little with the next look using Berry Boudoir. It’s exactly what I want to wear on my nails right now and I just had to put it out there. This example might not be for everyone (it’s certainly not for the clients I was just talking about), but the technique is absolutly sound, and can be used with all sorts of colours and stamping. Check out the step by step below and just think of the looks you could create with different CND™ Additives, Lecenté Stardusts or Glitters!
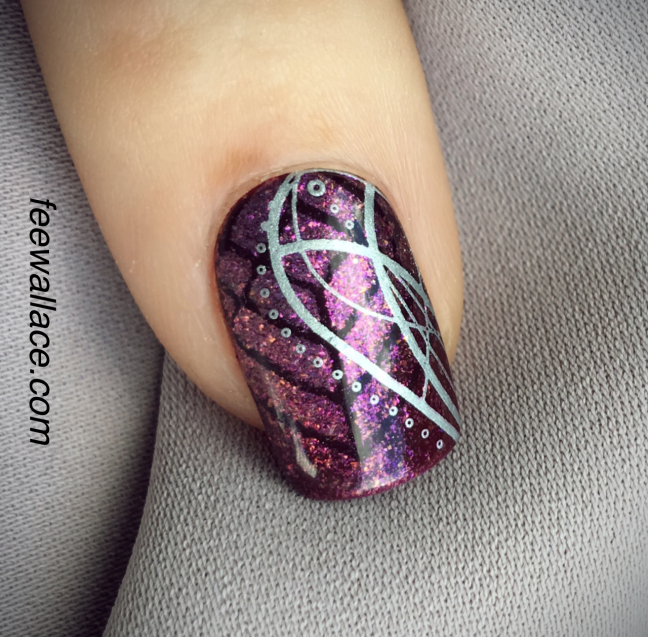
- After performing PEP to natural nails, apply and cure your Shellac Base Coat. Alternatively, if you’re decorating nail enhancements, prepare the surface and then apply and cure two layers of Shellac Berry Boudoir.
- Using the :YOURS Loves Fee stamping plate Deco Dreams, clean the plate and the :YOURS Halo Stamper with CND ScrubFresh and apply CND™ Vinylux Berry Boudoir. Scrape over once firmly with the scraper-card.
- Pick up the pattern with your Halo Stamper by rolling gently over the plate.
- Apply the design to the sticky top film of the cured Shellac colour, landing a little off centre. Tip – because you are stamping the same colour over the base colour this can seem tricky, make sure you have enough light and you’ll be fine!
- Now clean the Halo Elements stamping plate and Halo Stamper with CND ScrubFresh and apply Creative Play Polish My Act to the plate. Scrape over 1-3 times with the scraper-card.
- Pick up the pattern with your Halo Stamper by rolling gently over the plate, now apply the pattern diagonally across the bottom third of the nail on the right hand side.
- Use a dry Lecenté G1 Brush to apply a small amount of the Lecenté Startdust Red Ruby, first to the cuticle line, then up towards the extension edge of the nail. Tip – this is when the first stamped on design will magically come to life and be revealed! The Stardust WILL NOT stick to the dry polish that has been stamped on, just to the top film of the Shellac in the background.
- To finish, apply the Shellac Top Coat best suited to the needs of your clients nails.
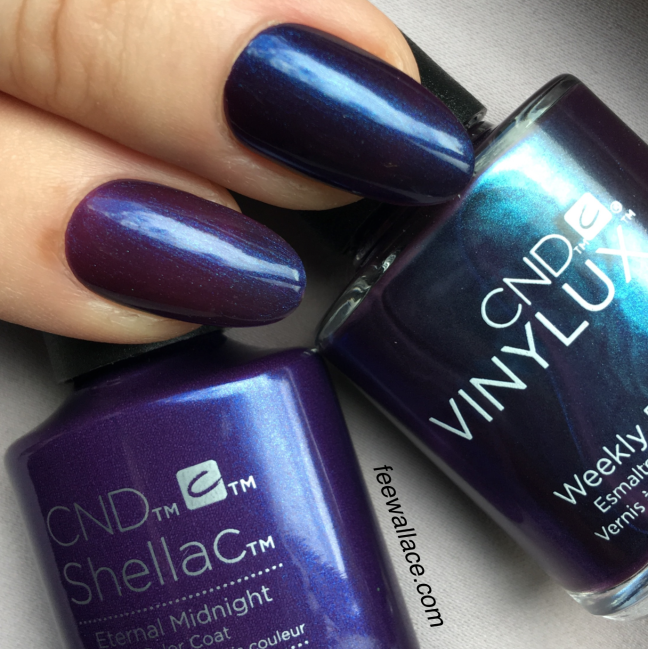
Eternal Midnight is just sumptuous. Of the whole collection, this colour has the most notable variation between the Shellac and Vinylux versions. Both are gorgeous, but a little different, with the Vinylux incarnation appearing darker and more navy. At first glance, we’d be forgiven for thinking the Shellac version is too similar to Grape Gum or Purple Purple. There is a marked enough difference, especially in the texture and tone of the shimmer in it, for me to definitely want it along with those other purples.
I’m IN LOVE with the nail art look I chose for Eternal Midnight. It’s cyber-chic, industrial-aesthetic, goth-ombré, ‘ghost in the machine’, perfection. I flippin’ adore it. I hope you like it…
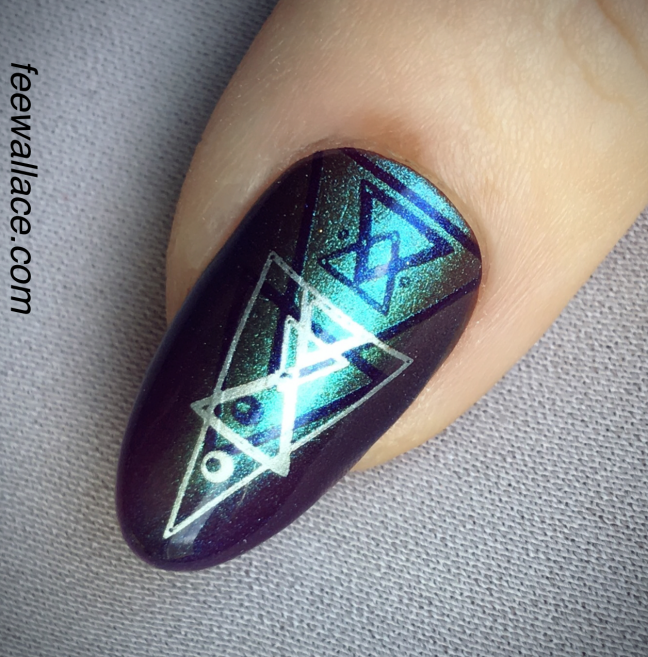
- After performing PEP to natural nails, apply and cure your Shellac Base Coat. Alternatively, if you’re decorating nail enhancements, prepare the surface and then apply and cure two layers of Shellac Eternal Midnight.
- Using the :YOURS Loves Fee stamping plate Halo Elements, clean the plate and the :YOURS Halo Stamper with CND ScrubFresh and apply CND™ Creative Play Viral Violet. Scrape over once firmly with the scraper-card. Tip: It doesn’t have to be Viral Violet, choose any Creative Play colour that closely matched the background colour used when re-creating this design.
- Pick up the pattern with your Halo Stamper by rolling gently over the plate.
- Apply the design to the sticky top film of the cured Shellac colour, taking care to land the design dead centre. Tip – because you are stamping the same colour over the base colour this can seem tricky, make sure you have enough light and you’ll be fine!
- Now clean the plate and stamper with CND ScrubFresh and apply Creative Play Polish My Act. Scrape over 1-3 times with the scraper-card.
- Pick up the pattern with your Halo Stamper by rolling gently over the plate and apply the design.
- Use the Lecenté G1 brush dipped into Lecenté Purple Chameleon Chrome Powder to apply a very small amount of powder, first to the cuticle line, then up towards the extension edge of the nail. Tip – Lecenté Chrome Powders are normally applied over Lecenté Layer It to get the chrome effect. Here we are using the Chrome Powder directly on the top film of the cured Shellac colour layer. The effect is different, and very beautiful!
- To finish, apply the Shellac Top Coat best suited to the needs of your clients nails.
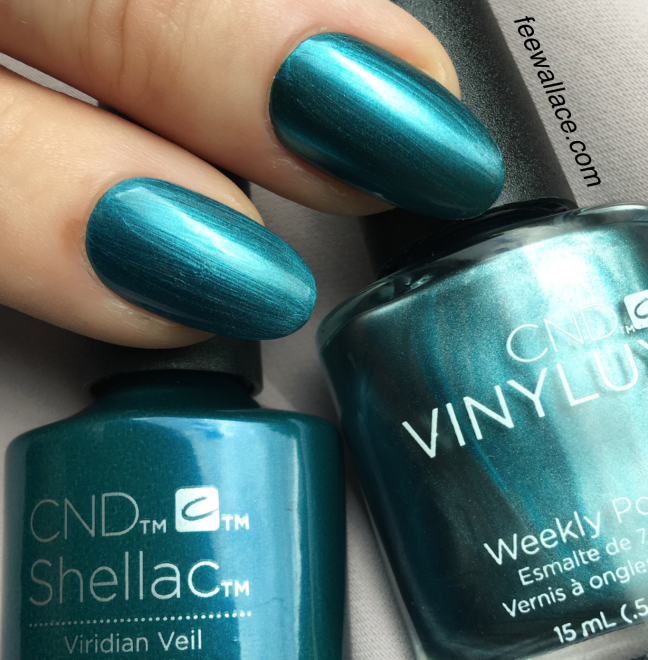
Oh my actual Ocean Goddess! Viridian Veil is the most luxurious metallic teal we could ever wish for. It’s MILES away from Hotski, which is positively yellow in comparison. It’s also crisper, less smokey, and far more opaque than Lost Lab. This colour is another one coat wonder, which makes me very happy.
Viridian Veil is utterly bold. It made me think of how I imagine the sky to have looked in ancient Greece. I picture Zeus himself, throwing down golden bolts of lightning from atop Mount Olympus. The idea of creating this on a nail is thrilling me no end.
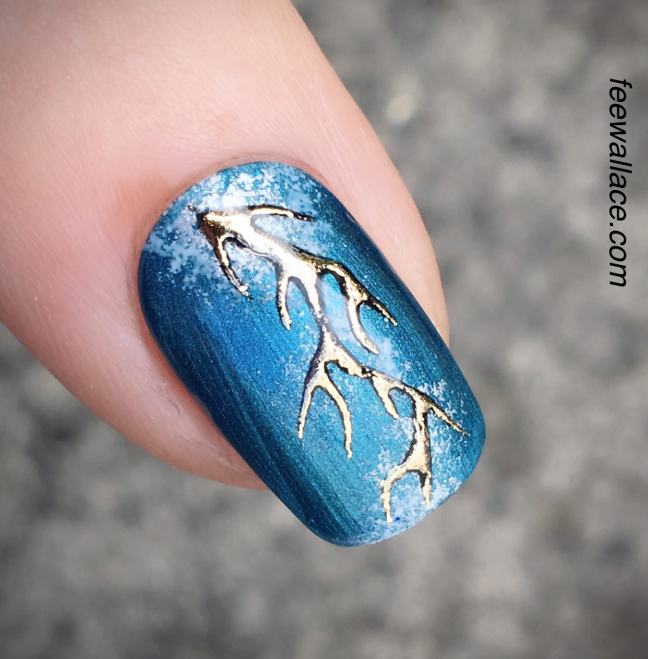
- After performing PEP to natural nails, apply and cure your Shellac Base Coat. Alternatively, if you’re decorating nail enhancements, prepare the surface and then apply and cure Shellac Viridian Veil.
- Apply and cure a super thin coat of Lecenté Layer It. Tip: This will give us a completely dry surface after curing, perfect for the next step!
- Pick up a little dab of Creative Play Life’s a Cupcake on a dense cosmetic sponge and sponge on, using tiny taps, to create what will be the ‘halo’ around the lightning bold.
- Repeat the last step this time using Creative Play Polish My Act, apply a little less this time.
- Use the Lecenté S2 Striping Brush and Shellac Black Pool to create the lightning bolt. Begin with one soft zig zag down the centre of the nail then add more lightning forks coming off both sides. Cure your Black Pool lightning bolt.
- With a small piece of Lecenté Bright Gold Foil press on and rub (matte side down) and the foil will adhere to the cured Shellac, but not to the dry background.
- To finish, apply the Shellac Top Coat best suited to the needs of your clients nails.
Thank you for checking out the blog!! I’ll be recreating some variations of the looks in this blog during a Facebook LIVE broadcast on Sweet Squared’s Facebook Page on Tuesday the 1st of August at 8pm. I’d love it if you can join me!
See You on Social!Join me over on Facebook! I’d love to know what you think.
Follow on Instagram for tons more photos.
Subscribe to my YouTube Channel for all the latest videos and banter x
Where to BuyTo buy any of the products used in these three looks in the UK & Ireland visit http://www.sweetsquared.com
For a list of Lecenté distributors world-wide, visit here: http://www.lecente.com/distributors/
For a list of :YOURS distributors world-wide, visit here: http://www.yourscosmetics.com/local-distribution/
If you don’t see your country on the list you can buy direct from :YOURS who ship world-wide: https://www.yourscosmetics.com/webshop/
Check out http://www.cnd.com for a list of international distributors.
Advertisements Share this:


